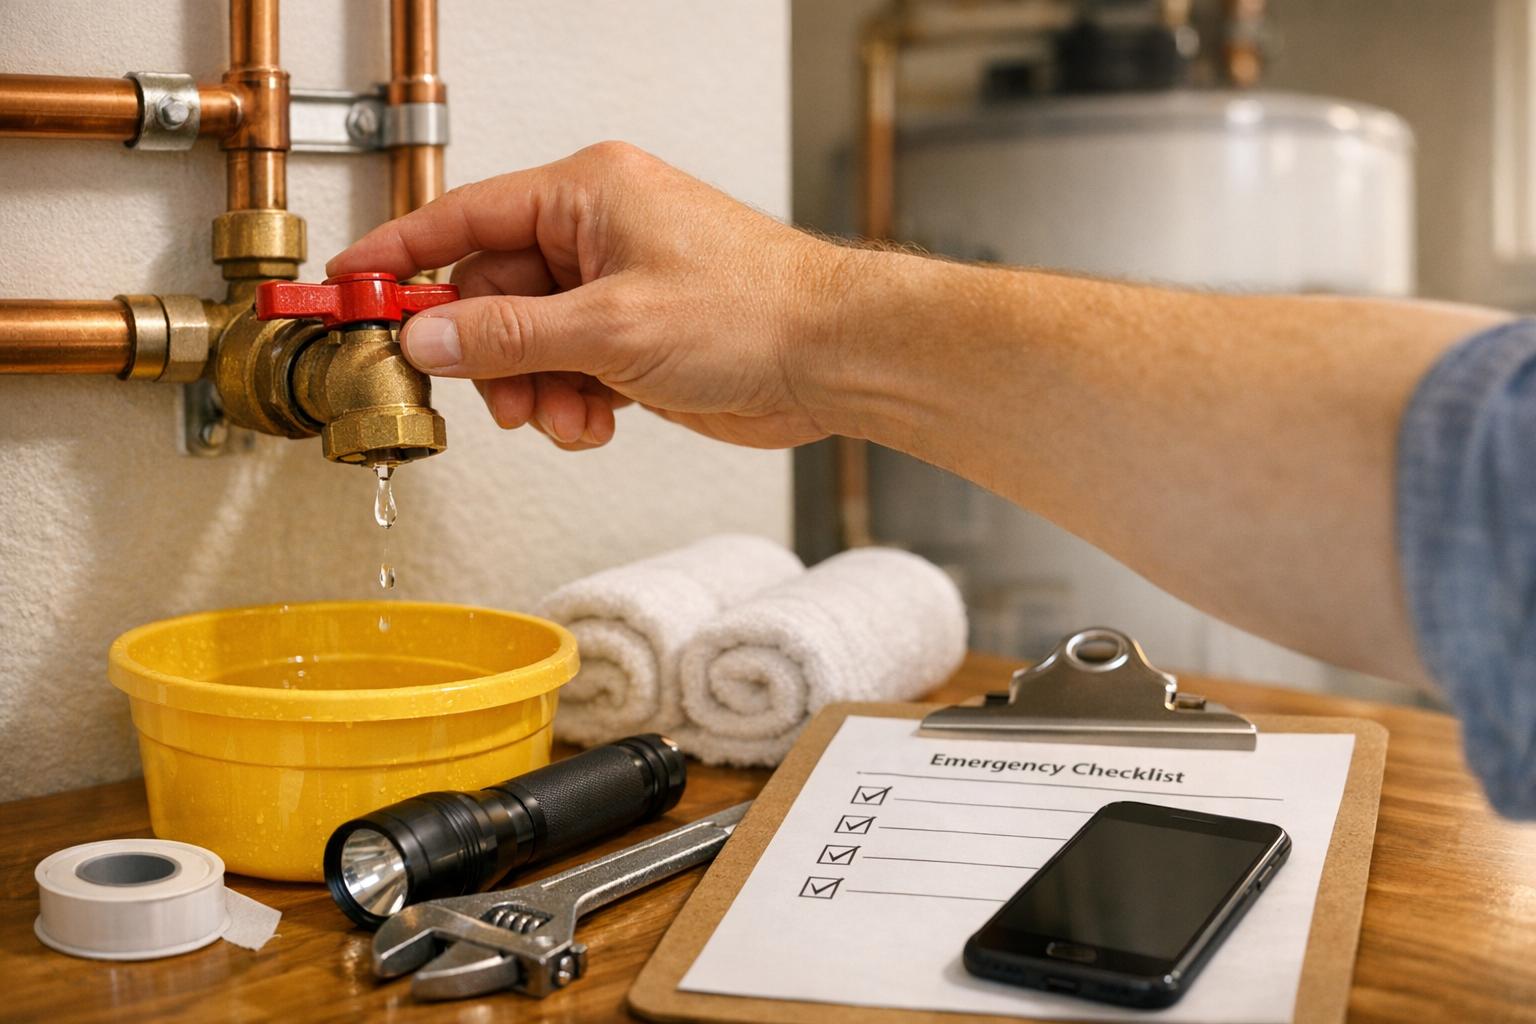

A plumbing emergency can cause costly damage in minutes. Here’s what to do immediately:
- Shut off the water supply: Locate your main shut-off valve (usually in the basement near the water meter) or use fixture-specific valves for sinks, toilets, or appliances.
- Turn off the water heater: Switch off the breaker for electric heaters or the gas supply for gas heaters to prevent damage.
- Drain the system: Open faucets and flush toilets to release pressure and remove remaining water.
- Contain water damage: Use buckets, towels, and a wet/dry vacuum to collect water. Set up fans and dehumidifiers to reduce moisture.
- Apply temporary fixes: Use clamps, tape, or epoxy putty to slow leaks until a plumber arrives.
- Document damage: Take photos and videos for insurance claims, noting the time of the leak and your actions.
Safety tips: Avoid electrical risks by turning off power in affected areas, watch for gas leaks, and stay clear of sewage backups.
Preparation matters: Keep an emergency plumbing kit (wrenches, tape, gloves, flashlight) near your shut-off valve, and save a plumber’s contact info for quick access. In Toronto, emergency plumbing services typically cost $250+ with hourly rates of $140–$180.
Act fast to protect your home and reduce repair costs.
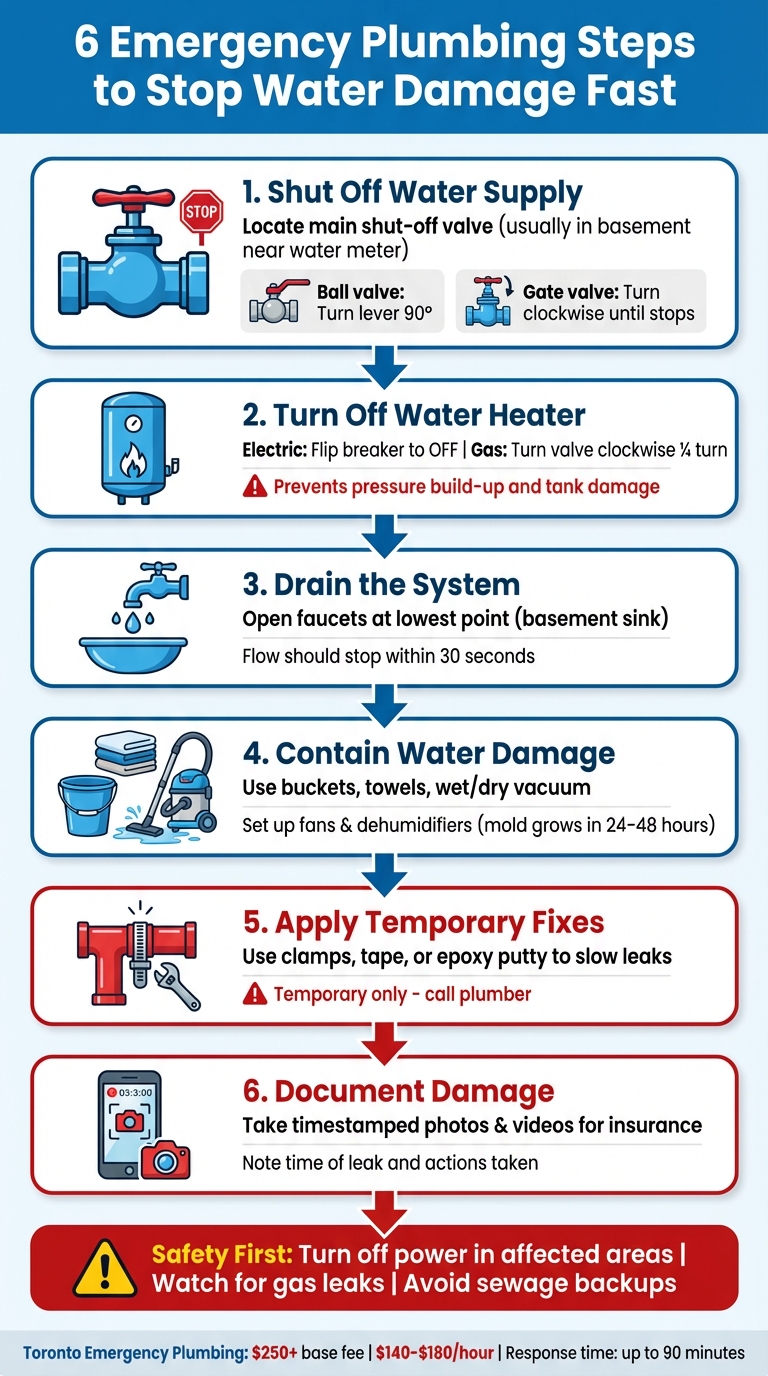
6 Emergency Plumbing Steps to Stop Water Damage Fast
Emergency Plumbing 101: What to Do in a Crisis | Quick Plumbing Solutions
First Steps to Take During a Plumbing Emergency
When faced with flooding, acting quickly to stop the water flow is crucial to minimize damage. These first steps should be your immediate response within the initial moments of the emergency.
Shut Off the Water Supply
The main shut-off valve is your first line of defence. In most Toronto homes, you'll find it in the basement near the water meter or in a utility area close to the furnace or water tank. Depending on the type of valve, here's how to turn it off:
- Ball valve: Rotate the lever 90 degrees so it’s perpendicular to the pipe.
- Gate valve: Turn the round wheel clockwise until it stops.
If you live in a high-rise condo, check for in-suite isolation valves in places like the laundry closet, under vanity cabinets, behind removable panels near the water heater, or above suspended bathroom ceilings. If you can’t find the valve, contact your building superintendent to shut off the vertical supply riser for your unit.
For smaller issues, like a leaking sink or toilet, you can use fixture-specific shut-offs instead of turning off water to the entire property. Here's a quick guide:
| Fixture | Shut-Off Valve Location | Action to Close |
|---|---|---|
| Toilet | Behind the tank, near the floor | Turn clockwise |
| Sink | Under the cabinet | Turn both (hot/cold) clockwise |
| Washing Machine | Behind the appliance | Turn both levers or wheels |
| Main Supply (Ball) | Basement or near water meter | Turn lever 90° (perpendicular) |
| Main Supply (Gate) | Basement or near water meter | Turn wheel clockwise until it stops |
To save time in future emergencies, label your main valve as "MAIN WATER" and test it regularly. A seized valve can delay your response when every second counts.
Once the water is off, the next step is to secure your water heater.
Turn Off the Water Heater
Turning off your water heater is critical to prevent pressure build-up or damage to the tank.
- For electric water heaters, go to the main electrical breaker panel and flip the dedicated circuit breaker to the "Off" position. To avoid electrical accidents, wear rubber-soled shoes and stand on a dry surface when handling the panel.
- For gas water heaters, find the gas shut-off valve on the supply line and turn it a quarter-turn clockwise. Then, set the temperature control dial on the heater to "Pilot" or "Off".
Make sure there’s at least 1 metre (3 feet) of clear space around the water heater so a plumber can easily access it when they arrive.
After securing the water heater, the final step is to drain the remaining water from your plumbing system.
Open Faucets to Drain Remaining Water
With the water supply off, open your faucets to release pressure from the system. This helps prevent pipe bursts, joint failures, and siphoning from hot water lines. Directing residual water into sinks also reduces the risk of leaks spreading further.
Start by opening both hot and cold taps at the lowest point in your home, like a basement sink or an outdoor hose bib, to drain water and debris. Then, open a hot water tap on the top floor halfway to allow air to vent through the system. Don’t forget to flush toilets to avoid overflow.
If you’ve successfully shut off the water, the flow should slow to a trickle within about 30 seconds. However, if pressure remains above 20 PSI after five minutes, check for other shut-offs you might have missed. Also, switch water softeners to "bypass" mode to stop resin media from absorbing debris during the draining process.
Reducing Water Damage While Waiting for the Plumber
Once you've turned off the water, your next priority should be limiting the damage. Here’s how to manage the situation until professional help arrives.
Collect and Contain Water
Start by placing buckets under any active drips. Use towels, mops, or a wet/dry vacuum to clear standing water. To prevent water from spreading further, build temporary barriers at doorways using rolled towels or sandbags. If furniture is at risk, elevate it with blocks or crates.
If you notice a bulge forming in the ceiling, carefully puncture it to release the trapped water into a bucket. This can help prevent the ceiling from collapsing under the weight of pooled water.
Once the standing water is under control, set up box fans and dehumidifiers to circulate air and reduce humidity. This step is critical since mould can start developing within 24 to 48 hours of water exposure.
For minor leaks that persist, consider these temporary fixes.
Temporary Fixes for Leaks
If the leak is small, you can slow or stop it with quick fixes like a pipe repair clamp, a strip of garden hose, or epoxy putty. Before applying any of these, ensure the area is dry. For threaded joints, plumber’s tape or self-fusing silicone tape can also help.
- Pipe repair clamps: Place a rubber patch or gasket over the leak, secure it with a metal clamp, and tighten the screws until the water flow stops.
- Garden hose strip: Don’t have a pipe clamp? Cut a section of garden hose lengthwise, wrap it around the damaged area, and secure it with hose clamps at both ends.
- Epoxy putty: This works well for copper and galvanized steel pipes. Knead the putty until it’s soft, then press it firmly over the leak.
For threaded joints, wrap plumber’s tape (Teflon) or self-fusing silicone tape around the area, but make sure the surface is completely dry before application. Keep in mind, even a small hole (1.5 mm) can waste up to 3,570 litres of water in a single day, costing you about $14.54 daily.
Be cautious not to overtighten clamps, as this could worsen the damage. These measures are only temporary and should hold things together until a plumber can make permanent repairs.
Once the immediate leak is under control, take the time to document everything for insurance purposes.
Document Damage for Insurance Purposes
Take photos and videos of the leak and all affected areas. Make sure your images include GPS and timestamp data. Note the time you discovered the leak, when you shut off the water, and any temporary repairs you made. Keep receipts for emergency supplies as evidence.
"Insurers evaluate water-loss claims on how quickly and thoroughly you mitigated damage. Accurate documentation helps secure full reimbursement." - Anta Plumbing
Don’t throw away damaged items until an insurance adjuster has inspected them. Additionally, when the plumber arrives, ask for a detailed written work order that clearly identifies the cause of the problem (e.g., "burst ¾-inch copper pipe"). This will be essential for your insurance claim.
Finding and Describing the Problem
Before your plumber shows up, it’s helpful to narrow down the issue so they can come prepared with the right tools. Start by checking common problem spots like sinks, behind appliances, and near water heaters for leaks. Keep an eye out for dripping taps, pooled water, wet ceilings, sagging floors, discoloured areas, or damp, exposed pipes.
If you can’t see any obvious leaks, try a water meter test. First, turn off all taps and water-using appliances. Then, check your water meter’s leak indicator, which is usually a small asterisk or coloured triangle. If it’s moving, there’s likely a leak somewhere in your system. For toilets, add a few drops of food colouring to the tank. If the colour shows up in the bowl without flushing, the flapper is leaking. These steps can help you spot the problem and prepare for repairs before things get worse.
Check Common Problem Areas
Be on the lookout for water stains, bulging paint, or mould on walls and ceilings - they’re classic signs of hidden leaks. Warped or spongy flooring might mean there’s a slab leak under your foundation. If you have copper pipes, check for green corrosion (patina) or tiny pinhole leaks. Also, take note if your hot water looks rusty - it could be a sign of pipe trouble. Outdoors, unusually lush patches of grass or persistent wet spots in your yard could point to a leak in an underground line or irrigation system.
If none of these signs show up, it might be time to investigate potential drain or sewer issues.
Spot Signs of Sewer or Drain Issues
Sewer and drain problems tend to come with their own set of warning signs. Watch for foul odours (like rotten eggs), slow-draining sinks or tubs, standing water, or toilets that gurgle or need frequent plunging. If multiple fixtures are acting up, it’s likely a mainline issue. On the other hand, if only one fixture is affected, the problem is probably a local clog.
"If sewage is coming up a floor drain or basement fixtures during/after rain, call the City... If only your home is affected (no rain event, isolated blockage), call a licensed plumber." - Greg's Plumbing & Heating
Pay attention to gurgling sounds when flushing the toilet or running water - these could be signs of a mainline blockage or venting problem. If sewage backs up through floor drains or basement fixtures after heavy rain, it may point to an issue with the municipal system rather than your home’s plumbing. When reaching out to a plumber, be sure to share details like whether the issue happened during rain, which fixtures are affected, and any unusual smells or noises you’ve noticed.
sbb-itb-466cac3
Safety Steps to Prevent Additional Hazards
When dealing with a plumbing emergency, it's not just about reducing damage - it’s also about keeping yourself and your family safe. Plumbing issues can escalate quickly, leading to dangerous situations like electrical hazards, gas leaks, or exposure to sewage. Taking the right precautions while waiting for professional assistance can help avoid serious risks.
Avoid Electrical Hazards
Water and electricity are a dangerous mix, so securing your electrical systems should be your first step. If water is pooling near outlets, appliances, or your electrical panel, turn off the breakers for those areas immediately. For electric water heaters, shut off the dedicated breaker to prevent shocks or further damage.
If any electrical components are wet, sparking, or emitting a burning smell, evacuate the area and call your utility provider right away. When accessing a breaker in a damp environment, always stand on a dry, non-conductive surface. Never attempt to restore power to appliances like water heaters or boilers until a professional has inspected them and confirmed they’re safe to use.
Watch for Gas Line Risks
After addressing electrical concerns, check for potential gas hazards. Natural gas leaks are dangerous and often detectable by a distinct "rotten egg" smell. If you notice this odour or hear hissing from a pipe, evacuate the building immediately. Avoid using light switches, phones, or any electrical devices, as they could create sparks. Warn neighbours to stay away from the area as well.
"If you smell gas, do not attempt to locate the leak. Instead, leave the house or building right away. Do not turn on or off any electrical switches, appliances, or lights, as an electrical charge could create a spark." - Peoples Natural Gas
If the issue involves a gas water heater, turn the gas control valve to "Off" or "Pilot" and shut off the gas supply lever - but only if it’s safe to do so without entering a flooded or contaminated area. Once you’re in a secure location, call 911 and your gas provider’s emergency line. Never use outdoor appliances like barbecues or generators indoors, as they release carbon monoxide, which is deadly in enclosed spaces.
Protect Against Sewage Exposure
After electrical and gas risks are handled, focus on avoiding exposure to sewage. Sewage backups can carry harmful bacteria, viruses, and parasites, posing serious health risks. Stop all water use immediately - this means no flushing toilets, running laundry, or taking showers - to avoid worsening the backup. Keep everyone, including pets, out of the affected area.
"Sewage backups pose significant health risks due to the presence of harmful bacteria, viruses, and parasites. Exposure can lead to infections and diseases." - Mike Martinez, Owner, Accountable Home Plumbing
Block floor registers in the affected area to stop your HVAC system from spreading contaminated air throughout your home. If water has been standing for over 24 hours, avoid using central air systems entirely, as they can circulate bacteria through the ductwork. Dispose of any porous materials that came into contact with sewage, and disinfect all non-porous surfaces thoroughly. Use waterproof boots, gloves, eye protection, and a mask when handling contaminated items or entering affected areas.
Building an Emergency Plumbing Kit
Having the right tools on hand before a plumbing emergency can save you both time and money. Since professional plumbers might take up to 90 minutes to arrive, being prepared with an emergency kit is a practical step. Here's what you should gather to handle minor issues until help arrives.
Basic Tools and Materials
Store your emergency plumbing tools in a bucket near your main water shut-off valve for quick access. Include two types of plungers: a sink plunger for flat surfaces and a flange plunger for toilets. You’ll also need an adjustable wrench for supply lines and a pipe wrench for larger fittings. Add Teflon tape for sealing threaded joints and plumber’s putty to secure faucet bases.
For temporary fixes, pack hose clamps and a piece of rubber to patch small leaks. Heavy-duty towels are useful for soaking up water, and a wet/dry vacuum with a pump mode can help remove standing water. Don’t forget safety essentials like rubber gloves, goggles, and a reliable flashlight with extra batteries. A charged power bank is also handy for staying connected during emergencies. Lastly, keep a digital camera or smartphone nearby to document damage with timestamped photos - insurance companies often assess claims based on how promptly you respond.
Keep Emergency Contact Information Handy
Equally important is knowing who to call during a plumbing crisis. Create an emergency binder and place it in an easy-to-find spot, like near your main shut-off valve or on the fridge. Include contact details for key services, such as Creed Plumbing (647-994-9450), Toronto Hydro (416-542-8000), your gas provider, and your insurance company. Make sure everyone in the household knows where this binder is kept.
"The best thing you can do is to always remember where you saved your plumber's number and call them for a residential plumbing repair."
– Jason Genah, Drain King Plumbers
Save these numbers in your phone as well, and set reminders to inspect your kit and maintain appliances like water heaters. When you contact a plumber during an emergency, have your address, photos of the damage, and the status of your shut-off valves ready. This will help them bring the right tools and parts to resolve the issue efficiently.
Conclusion
Quick and decisive action is your strongest ally when dealing with plumbing emergencies.
What starts as a small issue can escalate rapidly. A burst pipe, for example, can flood your home in no time, and mould growth can begin within just 24 to 48 hours of water exposure. Following a clear plan of action immediately can help safeguard your home and keep repair costs manageable.
"Knowing exactly what to do in the first five minutes preserves structural integrity, keeps insurance claims low, and speeds professional repairs."
– Anta Plumbing Master Plumber
Being prepared is just as important as acting quickly. Make sure everyone in your household knows where the shut-off valves are located, have an emergency kit ready, and keep a list of professional contacts easily accessible. These steps can help reduce panic in critical moments. Even small actions, like clearing the area for repairs, might save you $20–$30 in labour costs.
While temporary fixes can help control the situation, permanent repairs require a licensed professional. In Toronto, emergency plumbing services typically start at $250, with hourly rates between $140 and $180. This investment is essential to protect both your property and your health.
Save Creed Plumbing's number (647-994-9450) so you can quickly connect with licensed, insured professionals when emergencies strike. By combining preparation, prompt action, and expert assistance, you can minimize damage, reduce stress, and ensure your home is restored safely. Taking these steps will help keep your property secure until the repairs are complete.
FAQs
Where can I find the main water shut-off valve in my home during a plumbing emergency?
In a plumbing emergency, knowing where your main water shut-off valve is can make all the difference in preventing extensive damage. Typically, you’ll find it near the water meter, in the basement, crawlspace, utility room, or on an exterior wall close to the foundation. If your home doesn’t have a basement, it’s worth checking outside near the point where the water line enters your house or at the curb stop cap located on your lawn or driveway.
For those living in condos or apartments, the shut-off valve is often tucked away beneath the vanity sink in the main bathroom or hidden behind an access panel. Taking a moment now to locate it can save you precious time when every second counts.
How can I temporarily control a water leak until the plumber arrives?
If you’re facing a water leak, the first step is to turn off the water supply to stop further damage. Look for the shut-off valve close to the leak or, if needed, shut off the main water supply to your home. For a quick temporary solution, try wrapping the leaking pipe with duct tape or a pipe repair bandage to control the water flow. For smaller leaks, even a piece of rubber secured tightly with a clamp can work as a short-term fix. These simple measures can help limit the damage while you wait for a licensed plumber to handle the repair.
How can I document plumbing damage for my insurance claim?
To properly document plumbing damage for an insurance claim, start by taking clear photos and videos of the affected areas. Be thorough - capture any damaged belongings, structural issues, or visible water damage, and take shots from multiple angles to provide a complete view of the situation.
Save receipts and invoices for any temporary fixes, replacements, or cleanup services you’ve paid for. These records will showcase the expenses you’ve incurred and strengthen your claim. Additionally, jot down the date and time of the incident and any steps you took to prevent further damage, like turning off the water supply.
Comprehensive documentation will give your insurer everything they need to assess and process your claim without unnecessary delays.