
Toronto winters can freeze your pipes, causing costly damage. A burst pipe can spill hundreds of litres of water daily, with repairs ranging from $500 to $2,000 - excluding water damage restoration. Insulating pipes is a simple way to prevent freezing, reduce energy bills, and avoid mould caused by condensation.
Here’s what you need to know:
- At-risk pipes: Found in unheated areas (crawl spaces, attics, garages), exterior walls, and under-sink cabinets.
- Signs of freezing: Reduced water flow, frost on pipes, bulging, or strange odours from drains.
- Materials to use: Foam sleeves, fibreglass wrap, heat tape, and expanding foam sealant.
- Steps: Clean pipes, install insulation, wrap joints, apply heat tape, and seal gaps.
Preventive maintenance - like inspecting insulation and scheduling plumbing checks - can save you thousands. Keep your home warm, let faucets drip during cold snaps, and open cabinet doors to allow air circulation near pipes.
Why You Need to Insulate Pipes in Toronto
How Toronto's Winter Temperatures Affect Your Plumbing
Winters in Toronto are no joke, with temperatures often staying below freezing for weeks on end. When the mercury dips below -10°C at night, the City of Toronto urges homeowners to take measures to shield their plumbing. Why? Because freezing water inside your pipes can expand, causing cracks or even full-on bursts.
The City of Toronto states, "Frozen pipes can lead to significant property damage if they burst, resulting in no water for several days, depending on the severity of the repairs."
Supply pipes, in particular, are at higher risk due to their smaller diameter, making them more prone to freezing and bursting. This makes insulating your pipes a necessary step to avoid costly damage.
What It Costs to Repair Frozen or Burst Pipes
The financial impact of a burst pipe can be staggering. In just eight hours, a single burst pipe can release up to 400 litres of water. This can ruin drywall, flooring, and other parts of your home. Add in the costs of water extraction, mould removal, and structural repairs, and you’re looking at expenses that can quickly climb into the thousands. In some cases, the damage might even force you to leave your home temporarily while the repairs are completed.
The good news? Preventing this kind of disaster is far more affordable. Foam pipe sleeves and insulation tape, available at local hardware stores, cost a fraction of what repairs would. Plus, insulating your pipes doesn’t just protect them - it also reduces heat loss in your hot water lines, which can help lower your energy bills.
Taking these risks seriously is the first step in protecting your home. Later, we’ll explore practical insulation methods to keep your pipes safe.
Finding Pipes That Are at Risk of Freezing
Where At-Risk Pipes Are Usually Located
Pipes in unheated areas are the most vulnerable when temperatures drop. Spaces like crawl spaces, attics, and garages often lack insulation and heating, leaving any plumbing in these areas exposed to the cold . If your home has pipes running through these spots, they should be a top concern.
Exterior walls are another common problem area. Pipes located inside or against these walls can freeze easily, especially in Toronto’s harsh winters. Thin insulation or blocked airflow from closed kitchen or bathroom cabinets can make the situation worse . According to the City of Toronto, pipes near exterior walls or where the water service pipe enters through the foundation are particularly at risk.
| Vulnerable Area | Why It Is at Risk |
|---|---|
| Crawl Spaces/Attics | Unheated spaces prone to cold drafts. |
| Exterior Walls | Poor insulation allows cold air to reach the pipes. |
| Under-Sink Cabinets | Warm air is blocked from circulating inside. |
| Foundation Entry | Cold concrete and proximity to outdoors increase risk. |
| Outdoor Faucets | Direct exposure to freezing temperatures. |
| Garages | Pipes freeze quickly if the garage door is left open. |
Outdoor fixtures like hose bibs and sprinkler lines are often the first to freeze . Additionally, pay attention to the area around your water meter, which is usually in the basement or a utility closet near the foundation. Pipes in this location are especially prone to freezing.
Now that you know where to look, it’s equally important to recognize the signs of freezing pipes before they cause serious damage.
Warning Signs That a Pipe Might Freeze
Catching the problem early can save you a lot of trouble. One common sign is reduced water flow - if you turn on a tap and only get a trickle or no water, it could mean the pipe is frozen . Another clear indicator is frost forming on exposed pipes in areas like basements or crawl spaces .
Look out for physical changes in the pipes, such as bulging. This happens when ice inside the pipe expands, increasing the risk of bursting. You might also notice strange odours coming from your drains, which can occur if ice is blocking your plumbing’s ventilation system. During extreme cold, check the temperature inside under-sink cabinets on exterior walls and feel for drafts near dryer vents or rim joists .
Materials You'll Need for Pipe Insulation
Insulation Products That Work in Toronto Winters
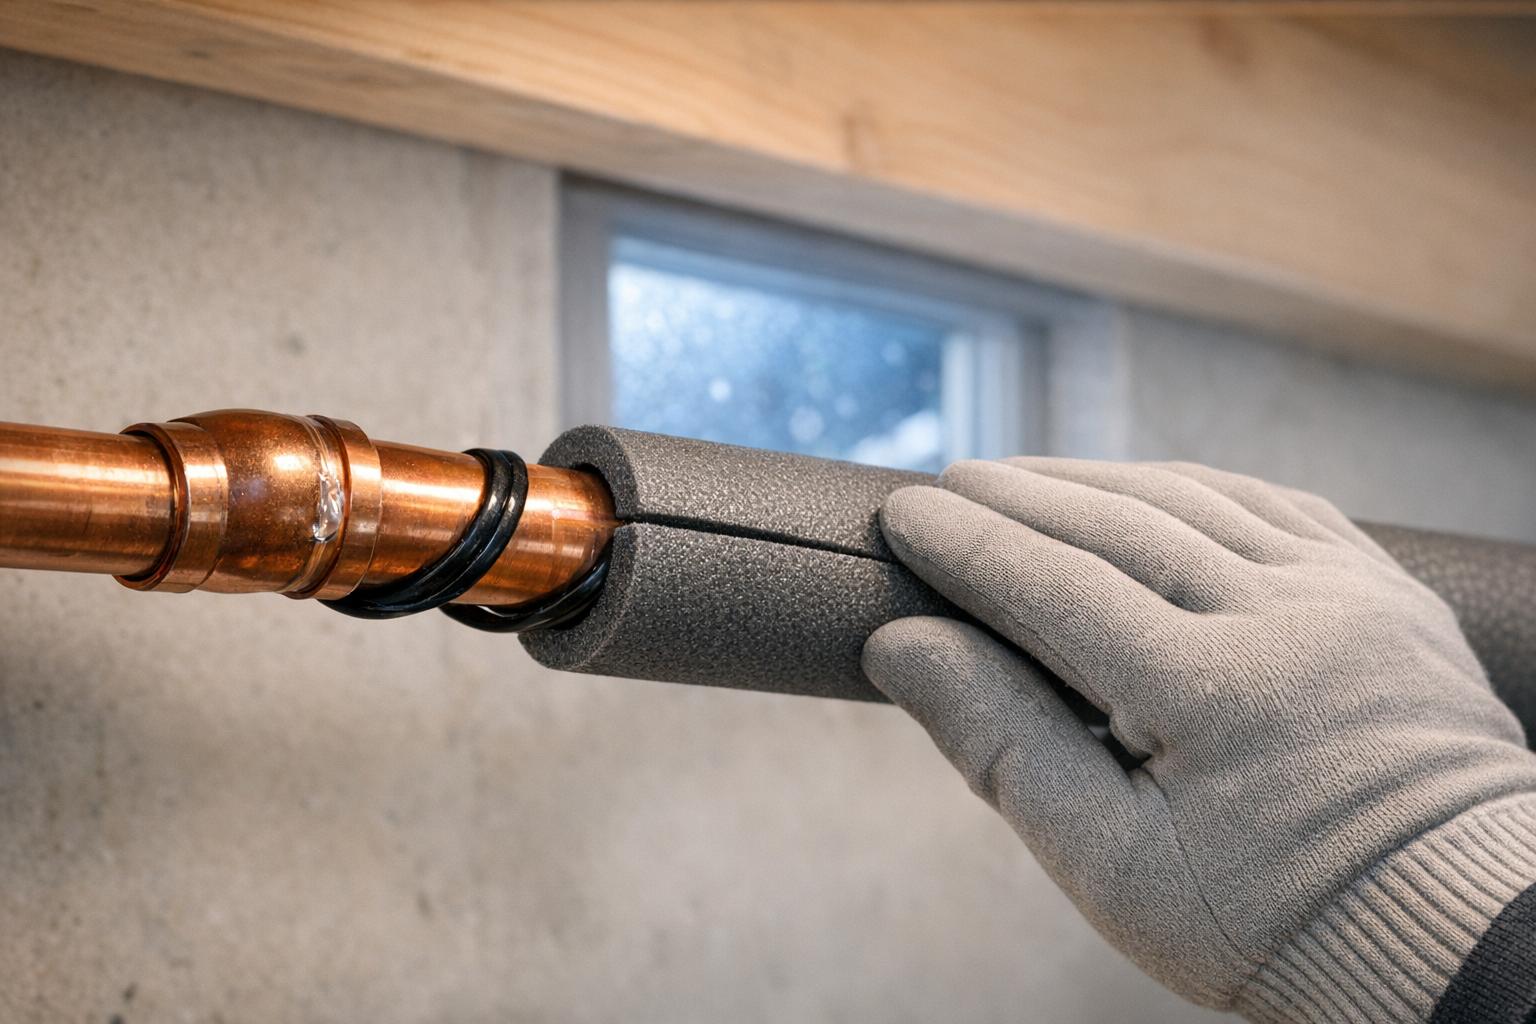
Foam pipe sleeves are an affordable and straightforward solution for insulating residential plumbing. They’re designed to fit over straight sections of copper, PVC, or galvanized steel pipes, featuring self-sealing slits for easy installation. For Toronto winters, a thickness of 1 inch is typically recommended to keep pipes protected from freezing temperatures.
Fibreglass pipe wrap is a great choice for hot water lines or areas with irregular shapes, like joints and elbows, where foam sleeves may not work. Its flexibility allows it to conform to these tricky spots. For tight spaces or areas prone to high humidity, rubber insulation is an effective option as it helps prevent condensation.
In extremely cold areas, such as attics or crawl spaces, self-regulating heat tape is a smart addition. This electric cable adjusts its heat output based on the pipe's temperature and works best when paired with foam insulation for added protection. Expanding foam sealant is useful for sealing gaps where pipes pass through walls or floors, helping to block cold air drafts. For exterior walls, rigid foam boards between 1¼ and 1⅝ inches thick are ideal for stopping wind and cold air penetration.
Once you’ve selected the right insulation materials, make sure you have the proper tools and supplies to get the job done efficiently.
Tools and Supplies for Installation
To cut foam sleeves and wraps to the correct size, a utility knife with sharp blades is essential. A measuring tape helps ensure you select insulation with the appropriate diameter and length for each pipe. If you’re working in dimly lit or cramped areas, a headlamp can be a lifesaver.
For sealing and securing the insulation, silicone tape or pipe insulation tape is key to creating a tight, moisture-resistant barrier at seams and joints. Zip ties or clamps can help hold the insulation firmly in place, especially on vertical pipes. Before installation, clean the pipes using rubbing alcohol and a lint-free cloth to ensure proper adhesive bonding and to reduce the risk of mould. Protective work gloves and safety glasses are also advisable, especially when handling fibreglass materials.
If you’re unsure about any part of the process, you can always reach out to Creed Plumbing for professional advice or assistance. Visit their website at Creed Plumbing.
How to Protect Pipes from Freezing (Easy Winter Prep!)
sbb-itb-466cac3
How to Insulate Your Pipes: Step-by-Step Instructions
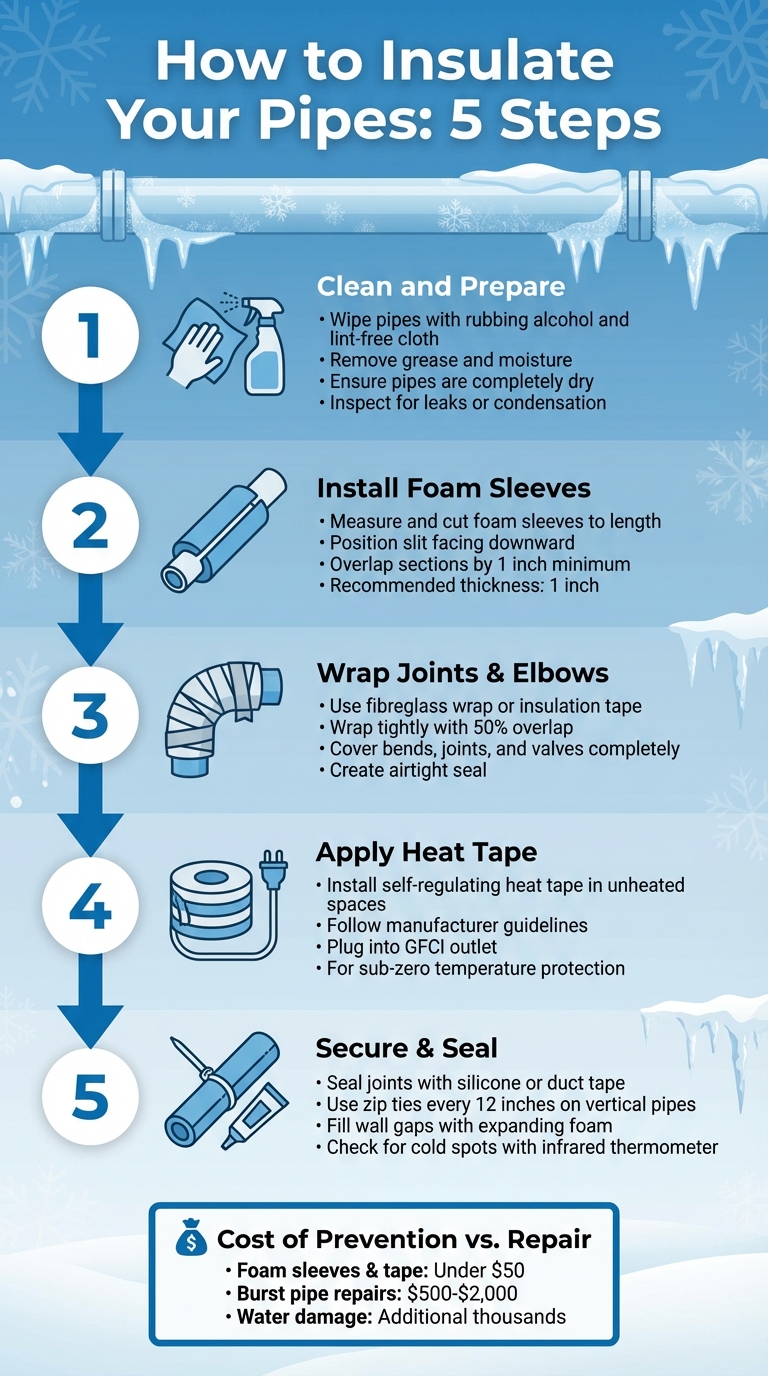
5-Step Guide to Insulating Pipes for Toronto Winters
Step 1: Clean and Prepare the Pipes
Start by wiping down your pipes with rubbing alcohol and a lint-free cloth to remove any grease or moisture. Make sure they are completely dry before moving forward. If you're working in a basement or crawl space, take the time to inspect for any leaks or condensation and fix those issues first. Once the pipes are clean and dry, you're ready to begin insulating.
Step 2: Install Foam Sleeves on Straight Pipes
Measure each section of straight pipe and cut foam sleeves to the appropriate length using a sharp utility knife. Position the sleeve so the self-sealing slit faces downward, which helps block moisture. Make sure the sleeve fits tightly without leaving any gaps. Where sections meet, overlap the edges by at least one inch to maintain a continuous barrier. Cover the entire length of the pipe to ensure consistent insulation.
Step 3: Insulate Joints, Elbows, and Valves
For areas like bends, joints, and valves where foam sleeves won’t fit, use fibreglass wrap or insulation tape. Wrap these areas tightly, overlapping each layer by at least half the tape's width. This ensures no surface is left exposed, creating an airtight seal that prevents cold air from reaching these vulnerable spots. Properly insulating these areas is crucial for maintaining the overall efficiency of the insulation.
Step 4: Apply Self-Regulating Heat Tape
In unheated spaces, self-regulating heat tape provides extra protection. Install the tape directly on the pipe according to the manufacturer’s guidelines, making sure not to overlap it unless explicitly allowed. Once installed, plug the tape into a GFCI outlet. This active heating solution is essential for pipes exposed to sub-zero temperatures .
Step 5: Secure and Seal the Insulation
To finish, seal the joints with silicone or duct tape, overlapping each piece by at least half its width. For vertical pipes, use zip ties or clamps spaced about every 12 inches to keep the insulation in place. If there are gaps where pipes pass through walls or floors, fill them with expanding foam sealant. Finally, use an infrared thermometer to check for any remaining cold spots and address them as needed. This ensures your insulation job is thorough and effective.
Winter Maintenance Checklist for Toronto Homeowners
After insulating your pipes, sticking to a solid maintenance routine is crucial to keep them protected throughout Toronto’s harsh winters.
Check Insulation for Wear or Damage
Grab a flashlight and an infrared thermometer to give your pipes a thorough inspection. Look for gaps, loose insulation, or cold spots. Pay attention to condensation on cold water pipes - this can be a red flag. If you spot any compressed or wet insulation, don’t try to patch it. Replace it right away to ensure proper protection.
Keep an Eye on Vulnerable Areas During Cold Snaps
When the forecast predicts nighttime temperatures dropping below –10°C, take action. Let a thin stream of water flow from the lowest faucet to prevent freezing, and keep interior doors open near plumbing to encourage warm air circulation. Raising room temperatures slightly above 8°C can also help. Watch for warning signs like frost on exposed pipes, sudden dips in water pressure, or odd odours from drains - these could point to an ice blockage.
Schedule Annual Plumbing Inspections
Booking a professional plumbing inspection in late fall can save you from headaches later. Experts can check that your insulation is properly installed and pinpoint hidden risks, like drafty spots or faulty components such as the main water shutoff, sump pumps, or water heater valves. This is especially important for older homes in areas like Cabbagetown or the Annex, where older plumbing systems may pose unique challenges.
For added peace of mind, Creed Plumbing (https://creedplumbing.ca) offers preventive services like leak checks, water pressure tests, and drain cleaning. These proactive measures can help you sidestep costly emergency repairs, which can easily run into the thousands. Stay on top of these tips to keep your plumbing winter-ready and avoid surprises.
Conclusion
Insulating your pipes is a smart way to prevent freezing, avoid costly water damage, and cut down on energy expenses. By cleaning pipes, installing foam sleeves, wrapping joints and elbows, applying heat tape, and sealing everything properly, you can build a strong defence against Toronto's unforgiving winters.
To get the most out of pipe insulation, pair it with other preventive steps. Keep your home's temperature above 12°C (55°F), even when you're not there, and open cabinet doors during cold spells to let warm air circulate around vulnerable plumbing areas.
"Prevention is always easier than dealing with damage." – Premier Plumbing
Investing a little time and money now can save you from the headache of expensive repairs later. Proper pipe insulation can mean the difference between peace of mind and thousands of dollars spent on water damage cleanup, mould removal, or replacing damaged belongings.
For ongoing maintenance, consider reaching out to Creed Plumbing. Their licensed technicians specialize in inspections and preventive care, helping you spot hidden risks and ensure your plumbing is ready for Toronto's next deep freeze.
FAQs
What materials work best for insulating pipes during Toronto’s winters?
Toronto’s winters can be brutally cold, which means protecting your pipes is a must. The best materials for this job include foam pipe sleeves, fibreglass wrap, elastomeric foam, and rubber insulation. These options are excellent at keeping heat in and standing up to extreme cold.
- Foam pipe sleeves: These are simple to install and provide solid insulation for most residential needs. They’re a go-to choice for many homeowners.
- Fibreglass wrap or rubber insulation: If you’re dealing with pipes in areas exposed to harsher conditions, these materials offer extra strength and cold resistance.
- Elastomeric foam: This flexible material is great for pipes in tighter spaces or spots where temperatures tend to fluctuate.
Using the right insulation doesn’t just stop your pipes from freezing - it also helps you avoid expensive repairs and keeps your plumbing working smoothly all winter long.
How can I tell if my pipes might freeze during winter?
Pipes are especially vulnerable to freezing when they're in unheated or poorly insulated spots like basements, attics, garages, or along exterior walls. Keep an eye on exposed pipes or those lacking proper insulation. If your indoor temperature dips below 17°C, particularly near water supply lines, the chances of freezing go up significantly.
You should also watch for warning signs like drafts around pipes, visible cracks or gaps in insulation, and unexpected drops in water pressure - these could signal a frozen section. To reduce the risk, make sure at-risk pipes are insulated and, during extreme cold, let faucets drip slightly to keep water moving. Regular inspections can help you spot and address issues early, preventing bigger problems down the line.
What should I do if I think a pipe is frozen?
If you think a pipe in your home has frozen, it’s important to act fast to avoid a potential burst and water damage. Start by pinpointing the frozen section, which is often in unheated spaces like basements, attics, or garages. Once located, gently warm the pipe using a hairdryer, heating pad, or warm towels wrapped around it. Be cautious - never use open flames or high-heat tools, as they can damage the pipe or even cause a fire.
While you’re thawing the pipe, keep the faucet slightly open. This helps water flow through and eases pressure in the pipe. If you spot any leaks or notice the pipe has already burst, call a licensed plumber right away to handle the repairs safely. And remember, if you’re unsure about what to do or feel uneasy about tackling the problem, it’s always smarter to bring in a professional.